Git | Working properly on a source code
Advanced Git usage for professional software development — branches, merging, rebasing, merge conflicts, and stashing. Everything you need to collaborate effectively on a shared codebase.

Software development with Git
After I covered the basic usage of Git on my previous post, I'll go through some more advanced usage of Git, necessary in the professional software development world.
For this post, I assume that you are already familiar with Git and its basics.
I'll start this post with the below interesting question.
Why is Git called a distributed version control system?
It's called distributed because, it allows a centrally managed code base to co-exist in different distributed git repositories within a team; where each team member can contribute on, and then merge it all together in a single code base.
How does that work?
In order to be able to work on a code base stored on a central git repository and collaborate with a team efficiently, we first need to create a copy of that version in a local git repository.
We can then create a separate branch of that code's current version, on which we can work with and merge changes back to the source code when done.
Branches
So, as I mentioned, we achieve this by using branches; but what branches are and how do they work?
In short, a code branch is a different version of that code, with a common base.
Now, in order to understand how branches work, we need to understand how commits work on Git.
When we commit changes, Git stores a snapshot of the code changes along with some metadata.
These snapshots are linked together with pointers, which are also stored in the snapshot's metadata.
When we first create a project, the git repo is by default on the master branch that points to our latest commit.
Branches are movable pointers, that point to the latest commit on the branch commit chain.
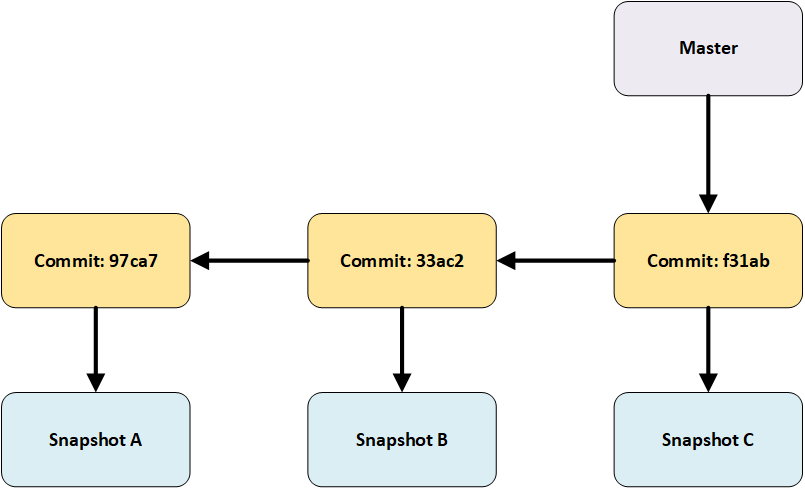
In the above image, the master branch points to its latest commit while chaining earlier commits history.
When we commit a new change, the branch pointer is moved automatically to that new commit.
If we create a new branch and then commit new changes to the code base; the new branch pointer moves forward to the new commit and the master branch pointer stays where it was.
We also have another pointer, called the HEAD; the HEAD essentially points to the branch we are currently on.
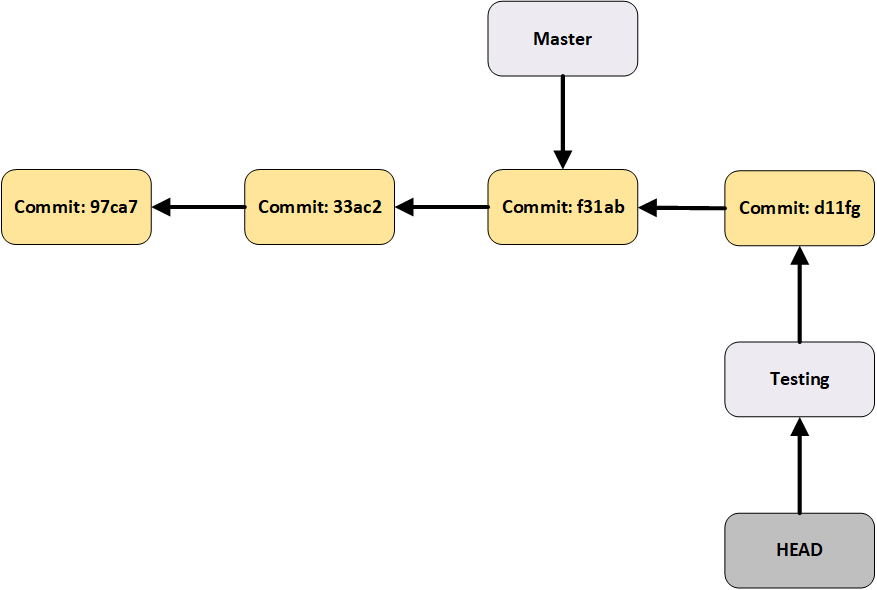
In the above image, the master branch is one commit behind the testing branch; and the HEAD points to the testing branch making it the current working branch.
When we are done with our branch commits and want to push all changes to the main code base, we merge all changes back to the master branch.
Now the new branch's pointer is removed and the master branch pointer moves to that commit (I'll explain further at branch merge section).
Finally, let's have a look at the commands for achieving all of this.
Setup test project
For this post, I'll be using the same test project I used in my previous post.
For those new here, I've created a test project which I pushed in a Github repository named TestProject.
The source code consists of 'README.md', 'exclude.txt', '.gitignore' and 'original.txt' files. The 'exclude.txt' file only exists in my local repo as it is excluded from Git by having it in the '.gitignore' file.
Create and switch to a new branch
Let's start by creating and switching to a new branch named testing, based on our source code, using the below commands.
# Create New Branch
git branch testing

# Switch to new branch (or any other branch)
git checkout testing

# Or use the -b option on the checkout command
# to create the new branch and automatically switch to it
git checkout -b testing

# You may also specify which branch to use as the base branch
git checkout -b <new-branch-name> <base-branch>
Now, let's add some additional text in our 'original.txt' file, add it to git and then commit it into our testing branch.
List branches
You can list all branches and see on which you are currently on with the command below.
# list all branches
git branch

# list all branches with more details
git branch -v
Merge branch
When we are done with our code updates, and new changes are now committed on our new branch, we are ready to merge those changes to our main source code.
First, we must go back to the branch we want to merge the changes on (ie. the master branch), and then merge the testing branch to it.
# Switch to branch we want to merge changes to
git checkout master

# Merge specified branch changes into current branch
git merge testing
You will now see the changes in the testing branch merged into our master branch.
Delete a branch
Now that all our changes are merged in the master branch, we may proceed and delete the testing branch using the command below.
# Delete a branch with -d if
# branch is either fully merged in
# upstream branch or in HEAD.
git branch -d testing

# Force Delete a branch
git branch -D testing
Merge conflicts
Now, let's see how we work in an environment with multiple other branches (usually, other people working on the same source code).
Let's create two different branches on our master branch. Branch 'test1' and 'test2'.
All branches now, point at the same commit.
Now checkout to test1 branch and add the line "Commit at test1 branch." in the 'original.txt' file. Add the file changes to git and commit it to the test1 branch.
After you are done, checkout to test2 branch and add the line "More changes at test2 branch." in the 'original.txt' file. Add the file changes to git and commit it to the test2 branch.
At this point, we have two different branches (excluding master) with different commits on the same source code.
Now, let us go back to the master branch and merge branch test1 into the master.
Finally, if we try now to merge test2 into the master branch, we will have a conflict.
In the 'original.txt' file, you'll now have markers added by git informing you of what the conflict is.
The top part of the marker will show you the changes from the head branch and at the bottom part, the changes attempted to merge from the branch.
You must fix the conflict manually and then add and commit the file changes into the master branch.
You may also check on the merge conflicts via the merge tool with below command.
# Check any merge conflicts with this merge tool
git mergetool
You are now finished with all branch changes successfully merged into the master branch.

In the above diagram, we can see the flow of our branches commits.
Rebase branch
Let us go two steps back at the stage where we have our test1 branch merged into master and the test2 branch with its changes waiting to be merged.
I'd like to show you now another approach to merging those changes to master, by using the rebase branch command.
To do so, we need to checkout into the test2 branch and then rebase that branch into master with the below command. If there is a conflict, we must resolve the conflict manually, add the file in git and then continue the rebase operation with the shown commands.
# switch to the branch you want to merge in master
git checkout test2

# rebase that branch in master
git rebase master

# continue rebase operation after manually,
# resolving the conflicts
git add <name-of-file-with-conflicts>
git rebase --continue

# skip rebase operation
git rebase --skip

# abort and rollback rebase operation
git rebase --abort
After the rebase operation is completed, and if you check the git log, you will see that we now have all changes merged into master but we are still in the test2 branch. This is because rebase command does everything on the test2 branch and not on the master.
Now we need to checkout back to master and merge the test2 branch normally into the master. This will shift the master pointer to the latest commit of the test2 branch.
You may also abort or skip the rebase operation, if you'd like, as shown in the commands above.
Stashing changes
Another cool command to know is the stash command to move current changes in a temporary location, so that we come back to them later and apply them in our code base.
# add changes into the stash
git stash

# get changes from stash
git stash pop
Conclusion
With all of this, I covered most of the commands a developer needs to know to properly use Git as a software developer.
Also, please note that this is an ongoing list; meaning that I'll be coming back, from time to time, to update the code snippets with additional useful git commands or update the existing ones.
I hope you enjoyed this series of Git-related posts and found useful as I do. Happy coding and stay tuned for more engineering posts!